Running a pipeline in RoboKudo
In this tutorial, we will start a basic perception pipeline in RoboKudo. We assume that you have already completed the setup from the installation instructions .
To illustrate the most basic components of the framework, we will need some test data first. Please download the ROS bag file for your ROS version as described below.
curl https://robokudo.ai.uni-bremen.de/_static/test.bag --output ~/robokudo_ws/test.bag
curl https://robokudo.ai.uni-bremen.de/_static/test.tar.gz --output ~/Downloads/test.tar.gz

tar -xzf ~/Downloads/test.tar.gz -C ~/robokudo_ws/
You should also now start a roscore in a separate terminal and let it open:
roscore
The central roscore instance is no longer needed with ROS 2.
Starting RoboKudo
Perception pipelines in RoboKudo are modelled as so-called analysis_engines in the descriptor/analysis_engines folder of any RoboKudo package. An analysis engine is basically a definition of a Behaviour Tree required for your use case. The core robokudo package offers an executable called main.py that we can use to run any of these pipelines. To see how this works, start a roscore and try to run the demo pipeline from robokudo:
rosrun robokudo main.py _ae=demo
ros2 run robokudo main _ae=demo
This will initialize the RoboKudo system and will wait for data to be published on the camera topics. To actually process some images we will need some data. Start the bagfile you have downloaded earlier now. You can do this by going into the location where you have stored the file and then execute:
rosbag play ~/robokudo_ws/test.bag --loop
ros2 bag play ~/robokudo_ws/test --loop
In the beginning, you will not see any graphical output. Let’s change that. First, please click on the 2d visualizer window(the one with the green text in the upper left) to focus it. Now, please use your left/right arrow or n/p keys on the 2D visualizer window to change between the different annotator outputs. You should now see the results of the individual annotators in the visualizer windows.
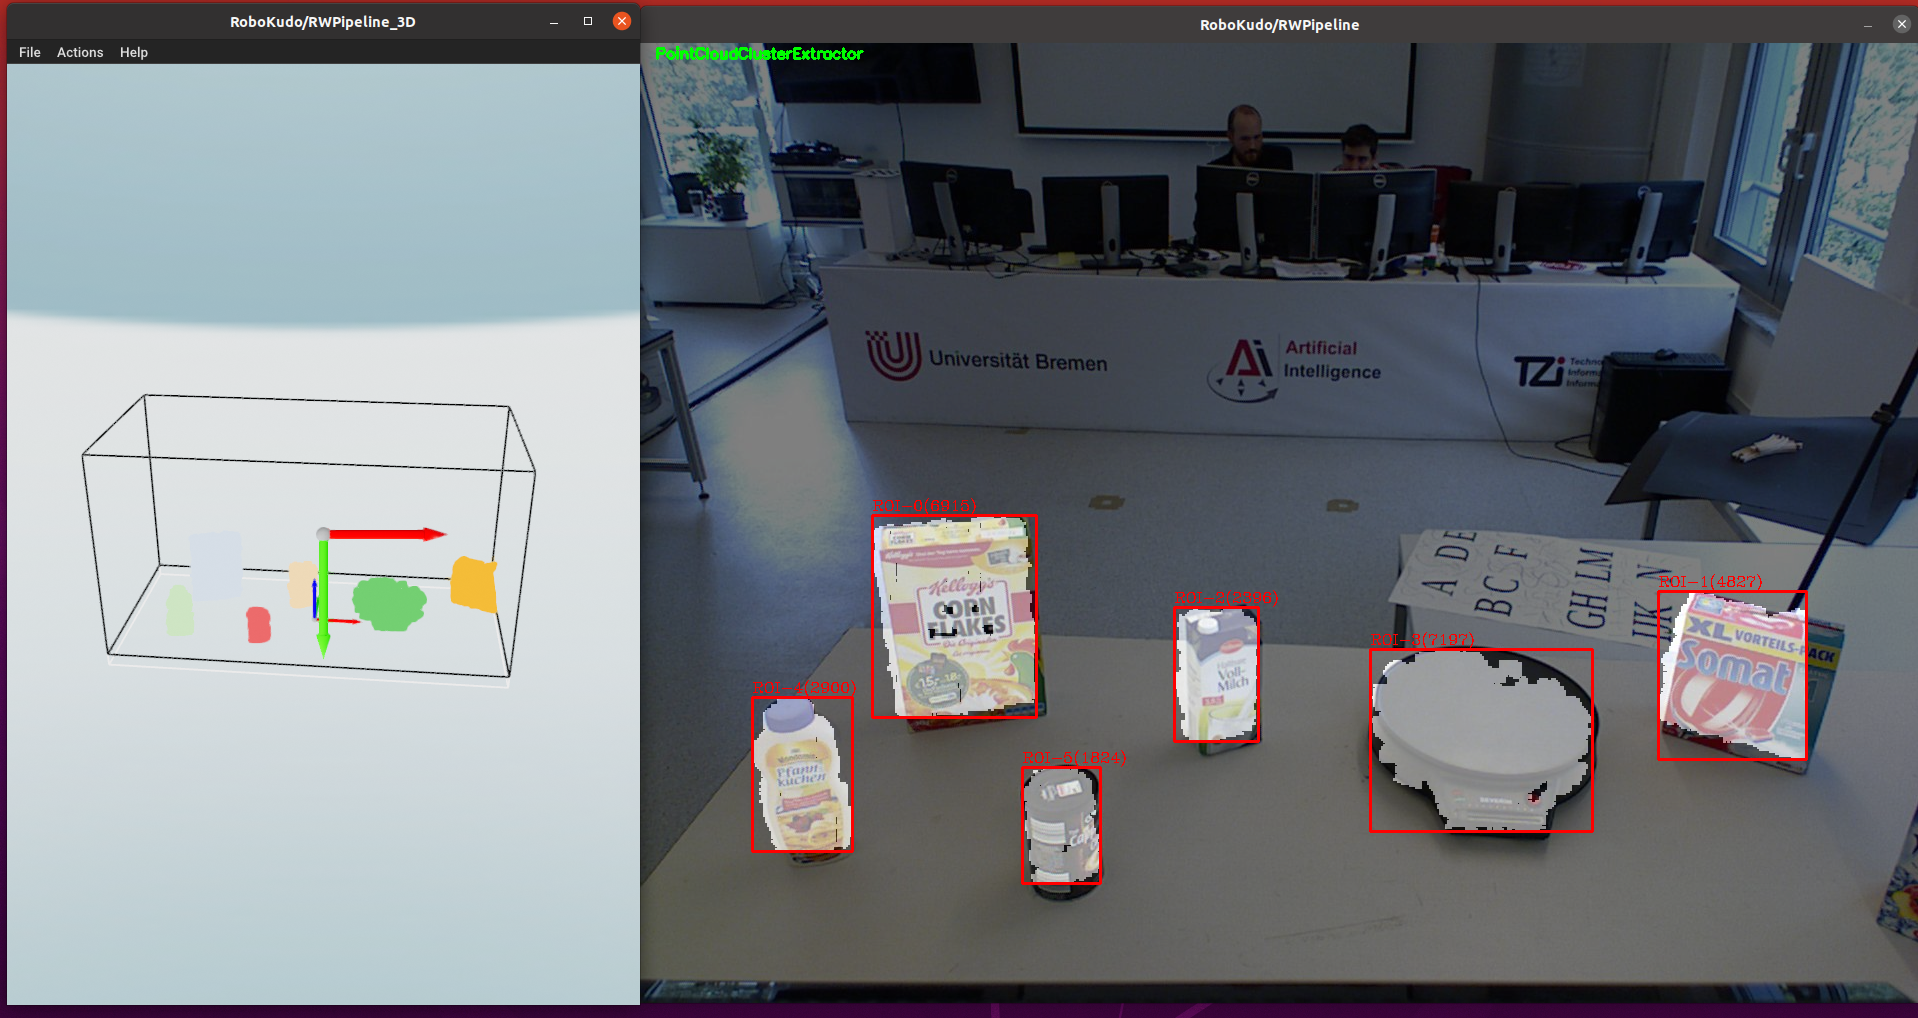
Please change to the graphical output of the PointCloudClusterExtractor. You will see a colored 2D Image with highlighted objects and the object point clouds in the 3D Visualizer. The output should be similar to the one from the image below:

On the screenshot you can see both visualizers in action. The left visualizer is an open3d Visualizer for pointclouds usually called ‘3D visualizer’. On the right side you can see the ‘2D visualizer’ which is an openCV image window. The core idea of RoboKudo is, that we have multiple experts called ‘annotators’ that analyze portions of the sensor data and generate annotations based on their expertise. The visualizers show the visual outputs of the Annotators. Not all annotators will generate outputs though.
We can now have a look into the demo analysis engine in descriptors/analysis_engines/demo.py we have just ran:
# Existing imports removed for brevity

class AnalysisEngine(robokudo.analysis_engine.AnalysisEngineInterface):
    def name(self):
        return "demo"

    def implementation(self):
        """
        Create a basic pipeline that does tabletop segmentation
        """
        kinect_camera_config = robokudo.descriptors.camera_configs.config_kinect_robot_wo_transform.CameraConfig()
        kinect_config = CollectionReaderAnnotator.Descriptor(
            camera_config=kinect_camera_config,
            camera_interface=robokudo.io.camera_interface.KinectCameraInterface(kinect_camera_config))

        seq = robokudo.pipeline.Pipeline("RWPipeline")
        seq.add_children(
            [
                robokudo.idioms.pipeline_init(),
                CollectionReaderAnnotator(descriptor=kinect_config),
                ImagePreprocessorAnnotator("ImagePreprocessor"),
                PointcloudCropAnnotator(),
                PlaneAnnotator(),
                PointCloudClusterExtractor(),
            ])
        return seq
In short, we are telling RoboKudo which camera driver shall we used in order to read the camera data properly. Afterwards, we are defining a RoboKudo pipeline with a list of Annotators and py_trees Behaviours which define the actual perception process. The CollectionReaderAnnotator will read in the sensor data while the ImagePreprocessorAnnotator will generate PointClouds from it. After these two preprocessing steps, the pointcloud size will be reduced by cropping, the most dominant plane (i.e. the table) and then look for objects on that.
Let us add another Annotator to that. For this we need to do two steps: 1) Add the Annotator in the sequence to the sequence at the end and 2) import it. Go to descriptors/analysis_engines/demo.py and adjust it the following way (changes highlighted):
# Existing imports removed for brevity

from robokudo.annotators.cluster_color import ClusterColorAnnotator # <-- Please add this line below the existing imports


class AnalysisEngine(robokudo.analysis_engine.AnalysisEngineInterface):
    def name(self):
        return "demo"

    def implementation(self):
        """
        Create a basic pipeline that does tabletop segmentation
        """
        kinect_camera_config = robokudo.descriptors.camera_configs.config_kinect_robot_wo_transform.CameraConfig()
        kinect_config = CollectionReaderAnnotator.Descriptor(
            camera_config=kinect_camera_config,
            camera_interface=robokudo.io.camera_interface.KinectCameraInterface(kinect_camera_config))

        seq = robokudo.pipeline.Pipeline("RWPipeline")
        seq.add_children(
            [
                robokudo.idioms.pipeline_init(),
                CollectionReaderAnnotator(descriptor=kinect_config),
                ImagePreprocessorAnnotator("ImagePreprocessor"),
                PointcloudCropAnnotator(),
                PlaneAnnotator(),
                PointCloudClusterExtractor(),
                ClusterColorAnnotator(), # <-- Please add this line
            ])
        return seq
When you now restart RoboKudo, you should see another the output of the ClusterColorAnnotator when you go through the annotators in the visualizers. It will show the most dominant color on each of the detected objects as well as the rest of the color distribution.
You have just learned the very basics of defining and starting a pipeline in RoboKudo! Please undo your changes in the descriptors/analysis_engines/demo.py file and head over to the next tutorial.